We all know subcontractors need to complete their SWMS before starting any high-risk construction work but did you know that as the principal contractor, you also need to ensure that a SWMS has been prepared before their work starts?
With HazardCo, it’s easy to stay on top of health and safety activity from your subbies.
Project Plus unlocks the HazardCo app for all of your subbies and it automatically shares the required reports with you, taking the hard yakka out of health & safety for everyone.
With HazardCo, your subbies can easily complete and share their SWMS and other on-site health and safety activity with you. The SWMS form guides your subbies through a step by step creation process. It gives you both confidence that potential hazards have been thought through and controls put in place to avoid harm.
With every report digitally stored on the Hub, you don’t need to chase paperwork or file it away… all your site’s health and safety documents are kept in the one place, which you can access from anywhere, at any time.
When all of your subbies are using HazardCo your on-site management becomes easier, you’re not bogged down with paperwork and all SWMS are in the same format making it faster to review than having to wrap your head around different templates.
SWMS are an essential part of managing health and safety on your site. HazardCo’s clever app makes it even easier for your subbies to create their SWMS and share it with you quickly – keeping your site safe and saving you time every day.
For help getting your subbies signed up, call the HazardCo team today on 1800 954 702.
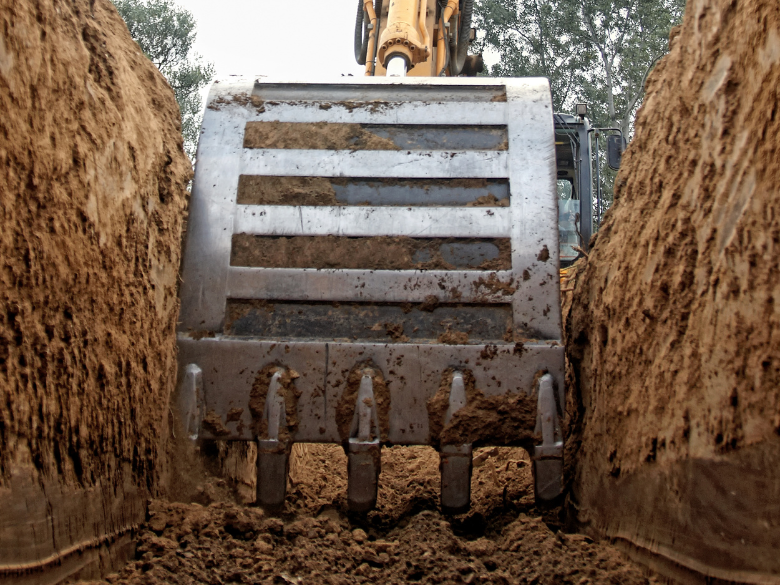
It’s never good to find out the hard way that there’s a gas, power, water or communications line buried right where you need to put something on your site. When planning for excavation works, it is important to implement safe excavation practices to minimise the risk of injury and hitting critical services.
Digging blind can result in construction delays, increased costs and serious incidents.
What is the definition of excavation?
Excavation work is referred to as any work involving the removal of soil or rock from a site to form an open face, hole or cavity, using tools, machinery or explosives. This includes open excavations, potholing, pit excavations, trenches, retaining walls and shafts and tunnels.
What are my legal obligations?
Employers have a legal duty of care to take reasonable actions to protect both the people and the services which may be affected by their work. Getting and using the appropriate information on the services is an important part of ensuring safe excavation on your site. There is a large range of options this can cover, so we will cover the basics in this article. If you have more complex excavations and want advice then get in contact with us.
Remember any ground disturbance regardless of depth can damage infrastructure networks like gas, water, electricity so you need to get the right information to keep you & the underground services safe.
Where do I start to prevent incidents on-site, protect workers and prevent asset damage?
First, you need to get information on what the assets in the area may be. You can get this information from Before You Dig Australia. This online system is the easiest way to request known plans from the asset owners. It is important to know that not all Asset Owners are members of Before You Dig Australia, so it cannot show you everything that is in the area of your excavation. You may need to contact any other asset owners directly to get hold of plans, drawings and information regarding their assets known positions prior to starting your work.
Wait to receive all information on the assets before commencing work, and only refer to plans that are current.
Once you have information on the assets, make sure the plans are with the workers on-site and that they have appropriate health and safety information and instruction. This information must also be made available to the principal contractor and other subcontractors, and be easily available for inspection for the duration of the work. If you have a notifiable incident the information must be kept for at least 2 years. You should also isolate work around the underground assets from the public.
Pay attention to the clues around your site such as marker posts, inspection points and metres. Never assume pipes and cables run underground in a straight line or are at their correctly specified depth, and always assume all lines are live, even if they look as though they are abandoned or decommissioned.
Remember all digging activities can damage underground infrastructure. You should conduct a risk assessment for the task so that you can identify the hazards to focus on, and put in place suitable controls. Workers involved in the excavation need to be trained and competent to do their part of the work e.g the Excavator operator is appropriately licensed.
Quick tips: The 5 P’s for safe excavation
To minimise the risk of damage and potential loss of life, it’s best practice to follow the 5 P’s for safe excavation:
Plan – Plan ahead by lodging your Before You Dig Australia enquiry at least two business days before your project begins, and make sure you have the correct information required to not just carry out the work but how to respond to any possible emergencies.
Prepare – Prepare by reviewing all available plans from the asset owners and ensure you conduct a visual inspection of the site for any items such as put lids, marker posts, external vents and any other visual clue for service location prior to commencing works. If you need further verification you could have Ground Penetrating Radar (GPR) carried out to show exactly where buried things are.
Pothole – To confirm the exact location of the underground infrastructure(s), pothole if permitted using the asset owner’s stated method as specified on the asset owner’s plan and information pack. Work slowly on this as you’re actually trying to “hit” it but without damaging it.
Protect – If potholing has occurred, protect the infrastructure by using various methods; such as communicating to all working on site, erecting barriers and marking the location of the exposed infrastructure.
Proceed – You should only proceed with your excavation work after you have planned, potholed (unless prohibited) and have your necessary protective measures in place.
Remember to stay vigilant and watch for changes in the ground/soil as you dig.
Need Help?
If you’ve got a question about safe excavation or any other health and safety matter, our HazardCo Advisory Team is here to help. Give us a call on 1800 954 702.
Need more information?
Before You Dig Australia has resources available for your state or territory and best practice guidelines. Read our blog on Managing the health and safety risks associated with excavation work.
Get your team involved in health and safety, and watch your workplace become a safer, happier place for everyone.
Understanding your health and safety requirements to your workers
Under health and safety legislation, businesses have a duty to engage with workers and enable them to participate in improving health and safety. The business must:
- Ensure that workers’ views on health and safety matters are asked for and considered (within reason), and
- Have clear, effective, and on-going ways for workers to suggest improvements or raise concerns on a regular basis.
Remember that your subbies are also considered your workers when they are working for you.
Worker Participation and Engagement
Together with your workers, you can determine the best way to meet these requirements. What is reasonable and practicable will depend on your workers’ views and needs, the size of your business, and the nature of its risks.
Businesses must:
- Share information about health and safety
- Allow your workers time to think about these issues
- Give your workers a chance to:
- Share their thoughts and raise health and safety concerns, and
- Let them be part of the decision-making process
- Consider and listen to what your workers have to say
- Tell them about the outcomes promptly in a timely way
When is engagement required?
You will need to engage and consult with workers who are directly affected by a matter relating to health and safety. This includes when:
- Hazards are identified and assessed
- Making decisions about:
- Addressing risks
- The suitability of worksite facilities e.g toilets, hand washing, drinking water
- Monitoring worker health and work conditions
- Providing information and training to workers
- Procedures for resolving work health and safety issues
- Proposing changes that may affect the health and safety of workers
Worker Participation
It’s important to have meaningful and effective health and safety talks. It’s good for people and for business. This doesn’t mean hour-long talks or lots of documentation, it’s simply about approaching H&S with the right attitude and aiming to get everyone involved.
HazardCo makes it even simpler to do this with our ‘Toolbox Meeting’ feature on our HazardCo App – handy for making sure everyone on-site is keeping on top of what’s going on.
If you need a hand getting started or would like more information, get in touch with the friendly HazardCo team today.
Any work undertaken near live overhead electric lines carries the risk of electric shock. Touching a live overhead line with any part of the body, tools or any other equipment can cause serious injury and even fatality.
Make sure that you and your team are aware of the following steps that can be taken to manage the risk of an electric shock.
Forward planning is essential. Before work starts, the person in control should:
- Identify all overhead electric lines in the area where work will be carried out and identify any potential hazards
- Assess the risk of harm
- Eliminate the risk of electric shock by disconnecting the electricity supply to the overhead lines
- Minimise if you are not able to disconnect the electrical supply then implement other controls such as insulation.
You must prepare a SWMS before work starts and make sure it includes all the potential hazards and expected controls. Collaborate with your workers in developing the SWMS, ensuring they understand how the task is to be performed.
Eliminating the risk of electric shock
Disconnecting the electric supply
The safest option to eliminate the risk of electric shock is to temporarily disconnect a property’s electricity supply from the electricity distribution lines so that the overhead line to the property is no longer live.
Keep people informed so they can plan ahead
Find out who needs to know that the electricity supply will be temporarily disconnected. Such as:
- The property owner
- People working on-site
- Other businesses working at the site – in this case, businesses must use the 3 C’s – consult, cooperate and coordinate activities to manage the shared health and safety risks. You can read more about this in our blog ‘Overlapping Duties: Working with other businesses’
Anyone who could be affected by the disconnection of the electricity supply should be told:
- How long the power will be off
- Who will be affected and when
- What will be done to ensure that the power is off for as short a time as possible?
Safe Approach Distances (SADs)
If work needs to take place near an overhead electric line then the worker’s body, their tools, and their equipment must be kept a safe distance away from the overhead line, or else the electrical supply must be disconnected by the approved electrical supplier. This is known as the safe approach distance, or SAD.
More information on Safe Approach Distances can be found on your state Regulator’s website or contacting the energy supplier.
Keeping you and your team safe at work is a priority, so make sure you are aware of the requirements of working near power lines. The HazardCo App Site Review resource has a list of electrical controls that should be in place to mitigate the risk of electrical hazards. If in doubt, you can give our team of Health and Safety Advisors a call on 1800 954 702.
Worksites tend to be filled with constant noise from tools and machinery.
While noise often means things are getting done, there is a downside to it. Hazardous noise can affect a worker’s physical and mental wellbeing including hearing loss, stress, and lower productivity. So to help you protect your hearing, here are a few helpful tips to keep your ears in tip-top-shape.
Understand noise and it’s path
Understanding what makes noise on-site and how it impacts people and different areas on site is critical. Ask yourself and your workers:
- Where does most of the noise come from?
- What tools or machinery are the loudest?
- How does noise travel around the site?
Once you understand the answers to the above, you can start putting actions into place to control noise on-site.
Be sure to monitor and review the controls throughout the project, as different stages will create varying levels of noise.
Eliminate or reduce
The easiest way to decrease the effect of excessive noise on your site is to eliminate the source of noise completely. But, chances are this isn’t possible on a busy site.
The next best thing is to reduce noise.
A couple of easy ways to do this include:
- Using less powerful tools
- Can the work be done differently to reduce noise levels
- Keep noisy machinery or work stations away from walls or corners – really anywhere noise can bounce off and echo throughout site
Isolation
Isolation involves creating a dedicated space for ‘noisy work’. This could be an enclosed room or area of site where all noisy work and machinery is used or placing workers in an enclosed cabin when operating mobile plant. This helps to block the path of noise and reduce the levels that reach your team.
Engineering
Having a good understanding of how machinery and tools operate can help modify processes to reduce noise at the source. Engineering controls can include choosing attachments or parts that are noise reducing, or changing the way machinery and tools are used.
Vibrations
With noise comes vibrations. These vibrations can be just as harmful as the noise itself.
Here are a few strategies to help decrease vibrations when using machines or power tools:
- Heavy surfaces vibrate less and radiate less noise. So if you can, perform all work with power tools on heavy surfaces, such as concrete.
- If you can, work on benches/ surfaces that aren’t solid – holes allow noise to escape and not bounce off the surface.
- Place machinery or generators in an area of site where they are not trapped by walls unless they are made of noise-cancelling/absorbing materials.
It’s not possible to escape noise on-site, however we can put steps in place to help reduce the effect that noise has on us while we’re working.
Safe Work Method Statements (SWMS) are an important tool to use within the Construction Industry for High Risk Construction Work (HRCW). We’ve listed the common myths we hear across the industry to help you get a better understanding of what really matters when it comes to using a SWMS, and how you can make sure your SWMS is going to help keep you and your workers safe.
Myth – You need to include all the relevant Health and Safety Legislation, Standards and Codes of Practice/Compliance Codes on the SWMS
Fact – It isn’t a legal requirement to include all the relevant Health and Safety Legislation, Standards and Codes of Practice/Compliance Codes on the SWMS. Some companies, particularly larger ones, might ask their contractors to include this information. You might want to consider using a SWMS template.
Myth – A SWMS has to be on paper
Fact – The SWMS should be kept at the workplace where the work is being carried out. It can be in electronic format (such as a SWMS App) or in a paper format as long as it is readily available to workers involved in the work, and for the entire time they are doing the work.
Myth – You need to include a Risk Matrix and score the hazards and controls on the SWMS
Fact – It isn’t a legal requirement to include a Risk Matrix or score the hazards and controls on the SWMS, however some companies (particularly big ones) might ask their contractors to do this.
Myth – A SWMS doesn’t need to be kept after the HRCW has finished
Fact – In most cases, a SWMS doesn’t need to be kept after the HRCW has finished, however if you have a notifiable incident it’s likely you will need to keep a copy of the SWMS for two years after the incident date. Notifiable incidents are incidents where there is a serious injury or illness, or a dangerous incident and there are certain criteria which can help to identify these types of incidents. If you have a notifiable incident we recommend you check with your Regulator (e.g. WorkSafe, Safe Work) about your requirements or HazardCo members can reach out to our Health and Safety Advisory team for incident support and advice.
Myth – Once a SWMS is developed, you don’t need to review or change it
Fact – Not true! If the control measures don’t adequately control the risk, it needs to be reviewed and changed. This might happen when:
- a change at the site has introduced a new risk to the HRCW which needs to be documented and controlled
- you talk to the workers and/or contractors about the HRCW and realise a change is required
- an incident happens because of the HRCW
- while monitoring the work you realise the measures don’t control the risk
At any stage, if work is not being carried out in line with the SWMS make sure work stops immediately (or as soon as safe to do so) and only resumes after the SWMS has been reviewed.
Remember, if you’re using a SWMS template, it needs to be specific to the site and the HRCW being conducted. Find out if your SWMS templates are up to scratch.
Myth – A SWMS can only include content relevant to the HRCW
Fact – Only hazards and risks that are directly related to HRCW activities need be included in a SWMS. You can add non HRCW hazards and risks if it makes sense, but don’t overdo it. We suggest removing anything unrelated to the high risk construction work to keep it simple.
Myth – A SWMS is required for all high-risk work
Fact – A SWMS is only required for the following High Risk Construction Work (HRCW) :
- involves a risk of a person falling more than 2 m
- is carried out on a telecommunication tower
- involves demolition of an element of a structure that is load-bearing
- involves demolition of an element of a structure that is related to the physical integrity of the structure
- involves, or is likely to involve, disturbing asbestos
- involves structural alteration or repair that requires temporary support to prevent collapse
- is carried out in or near a confined space
- is carried out in or near a shaft or trench deeper than 1.5 m or a tunnel
- involves the use of explosives
- is carried out on or near pressurised gas mains or piping
- is carried out on or near chemical, fuel or refrigerant lines
- is carried out on or near energised electrical installations or services
- is carried out in an area that may have a contaminated or flammable atmosphere
- involves tilt-up or precast concrete
- is carried out on, in or adjacent to a road, railway, shipping lane or other traffic corridor in use by traffic other than pedestrians
- is carried out in an area of a workplace where there is any movement of powered mobile plant
- is carried out in areas with artificial extremes of temperature
- is carried out in or near water or other liquid that involves a risk of drowning
- involves diving work.
You must complete a SWMS before undertaking any high-risk construction work, so we’ve made it as simple as possible. The HazardCo App includes 25 easy-to-edit SWMS templates as well as all the other health and safety tools you need to protect your crew and your business. Get a free trial.
Reinforcing steel can be used in many ways on a building site. Terms commonly used are rebars and mesh. They are steel bars or mesh wires used to strengthen walls, concrete, or other stone structures.
Workers can fall on the protruding bars which can result in deep lacerations or even life-threatening injuries, so it’s important that preventive measures are in place to reduce the risks.
Some of the hazards include;
- Rebars protruding in walking spaces
- Concrete formwork bars protruding at low levels
- Rebar scraps left unattended on the worksite
- Workers not using appropriate safety equipment to reduce risks.
Here are some ways you can avoid rebar hazards:
Safety Caps
Safety caps are made of plastic so they are a cost-effective way of covering the protruding steel rods. Even though they are small, the safety caps effectively protect against injuries and potential impalement.
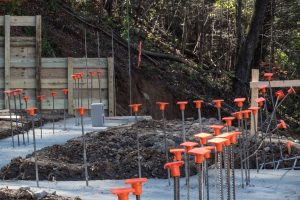
Their bright fluorescent colour increases visibility which lessens the chance of the worker walking into, or tripping over them by accident. They are also quick and easy to install.
Control access
In addition to using safety caps, access should be restricted to areas where there are protruding ends.
Injuries can happen when workers are not paying attention to the hazards around them, so ensure that your workers are aware of their surroundings, or physically prevent them from entering the area altogether by using barricades or tape to control access to those areas with hazards.
Keep a clean and tidy site
Ensure that you have a clean and tidy worksite. Gather and remove debris to keep the site free from scraps, and potential trip hazards.
Reinforcing steel scraps lying unattended can rust and pose a safety risk for workers, therefore, make sure you arrange prompt and proper disposal of the scrap materials.
PPE
PPE for people working with reinforcing steel may include;
- Hi-Vis clothing with long sleeves and pants
- Hard hat
- Safety glasses
- Suitable Steel cap boots
- Gloves
Best Practices
Construction can be dangerous. There are hazards in all worksites, which can result in life-threatening injuries. Carry out regular site reviews using the HazardCo App to ensure that hazards presented by reinforcing steel are correctly controlled.
Here are some best practices to follow, especially when working with reinforcing steel:
- Educate all workers handling reinforcing steel about the possible hazards
- Stay clear of the area when the rebars are hoisted
- Protect the protruding ends of reinforcing steel with safety caps
- Adequate lighting and signage should be present on the worksite
- Restrict access to dangerous areas
- Have a plan ready in case an injury occurs.
Of course, reach out to HazardCo and speak to one of our Health and Safety experts if you have any questions or need more support on avoiding reinforcing steel hazards.
We don’t need to tell you that asbestos is a big deal. The dangers of the substance are common knowledge. And knowledge is power, in this case, more so than most: the power to save lives.
With this in mind, we’d like to give you some basic information on the dangers of asbestos, where it can be found and what you can do to avoid it.
What are the different types of asbestos?
There are two types of asbestos:
- Friable (Class A): crushed or in a dust form, such as paper backing on vinyl or pipe lagging
- Non-friable (Class B): found in bonded products such as cement sheet and guttering.
Why is it so dangerous?
Inhaling asbestos fibres can cause a range of irreversible damage and diseases. Damage may occur in as little as five years or as long as 40-50 years later. Many people will not realise they have been exposed until it’s too late.
Where can it be found?
Approximately one third of all homes in Australia contain asbestos products. On 31st December 2003 asbestos was banned in Australia. Therefore any building constructed up until then has a high probability of containing asbestos. Remember, if you’re planning to renovate or partially demolish a building, have a survey done first to identify if asbestos containing material is present. If it is, contact your local Licensed asbestos removalist.
Is tere a safe way to dispose of asbestos?
Yes – as long as strict guidelines are followed. Bagging and wrapping asbestos pieces is essential in any sort of removal – and dumping asbestos-containing materials can only be done on authorised sites. We advise you to leave this to the Licensed asbestos removalists.
What more can you do?
Recognition means everything when it comes to asbestos. From sticking up posters on-site to equipping your team with knowledge of asbestos dangers through the HazardCo app, educating your workers could be the difference between life and death.
There are many asbestos awareness and training courses available online and face to face for further education and training.
Got Questions? Reach out to the HazardCo Health and Safety Advisory Support Team on 1800 954 702 to talk it over.
Asbestos Resources
WorkSafe Vic
- Website has plenty of free resources including:
WorkSafe QLD
- Website has plenty of free resources including:
SafeWork NSW
- Website has plenty of free resources including:
SafeWork SA
- Website has plenty of free resources including:
WorkSafe TAS
- Website has plenty of free resources including:
WorkSafe NT
- Website has plenty of free resources including:
Worksafe ACT
- Website has plenty of free resources including:
WorkSafe WA
- Website has plenty of free resources.
- AsbestosSafety.gov.au have some great content about how asbestos, finding local disposal facilities, health and exposure.
The more often you see a risk, the less serious it feels in your head. But the danger hasn’t gone away. Think back to your first time on a busy worksite, it probably felt overwhelming with so much happening around you. That same level of danger is still there. The problem is, after being around it for a while, your brain starts to ignore it and switches into “autopilot.” That’s when incidents happen. You have to make a conscious effort to stay alert because worksites are always changing.
Common incidents:
- Hitting your body on an object – This can be anything from hitting your head on scaffolding, grazing your leg or catching your arm on a protruding object.
- Manual handling – Lower back strains and sprains, shoulder injuries, torn muscles, and ligaments. Muscle injuries can have lengthy healing times and can be crippling.
- Nail guns – Lack of regular equipment servicing, sufficient training, and PPE can result in penetration injuries most commonly to the hands. These injuries can cause permanent damage.
- Hand tools – Commonly used tools such as hammers, hand saws and angle grinders. . Injuries usually result due to tools being dropped or misused.
- Slips/trips – Uneven ground surfaces, poor housekeeping, incorrect footwear, and weather conditions are common causes for slips and trips.
Corrective actions and recommendations
Hit body on object
- Plan tasks prior to carrying them out
- Assess the surroundings and adjust work tasks accordingly
- Take time navigating around the site
- Think about what you’re doing, not what you’re going to do
- Check to see if any surfaces, sharp edges or protruding objects need to be protected or removed
Manual handling
- Plan lifts prior to lifting loads, and ensure the path is clear
- Use mechanical aids to assist with lifting wherever possible
- Consider splitting heavier loads and minimising the distance the load is carried
- Adjust the work area to eliminate awkward positions and overreaching
- Warm up/stretch before each work day and after rest periods (lunch) – especially when the weather is colder
- Do not lift beyond abilities. Everyone is different in terms of what they can safely lift. Determine the weight and consider other alternatives as required. Such as a two person lift.
- Train workers in safe manual handling techniques
- Ensure appropriate footwear is worn
Nail gun
- Ensure the right nail gun is selected for the task
- Regular inspection and maintenance to ensure the equipment is in good working condition
- Consider the trigger system setting and the experience level of the operator. Bump fire or multi shot mode have a higher risk of injury.
- Do not fire in line with another person or into knots in the timber
- Provide adequate instruction, training and information to workers on safe handling and use of nail guns.
- Provide direct supervision to inexperienced workers until they are deemed competent
- Discuss the risk of using nail guns on-site in your toolbox meetings
- Pre-starts should be completed every day
- Task specific PPE to be worn (Gloves, boots, safety glasses, etc)
Hand Tools
- Visually inspect the tool before use. Any sign of damage/wear and tear, then replace the tool (if it’s bent, don’t bend it back – replace it!)
- Take your time – ensure you have a firm grip on the tool and check your surroundings.
- Use the correct tool for the job
- Review your hand placement. Ensure your free hand is as far away from the area as possible. It may be needed to hold the item steady, but ensure it is far away from blades/hammerheads as possible.
- Ensure appropriate PPE is worn for the task and the equipment used (Gloves, hard hat, etc)
Slip/trips
- Slow down in adverse wear conditions – If the worksite is dangerous, consider whether it is safe to work (flooded/boggy) or to wait until it has dried
- Things such as grit tape (or similar) can help provide grip in slippery areas such as outdoor ramps
- Ensure housekeeping is maintained to remove obstacles and create clear pathways
- Wipe/dry wet flooring wherever possible (especially tiles/lino/varnished flooring)
- Plan tasks prior to carrying them out and avoid rushing
- Appropriate footwear should be worn
Of course, reach out to HazardCo and speak to one of our expert Health and Safety Advisors if you have any questions or need more support on ways to combat common incidents on-site. You can contact us on 1800 954 702.
The construction industry is known for its potential hazards and risks, and unfortunately, incidents sometimes occur. Having an incident on-site can be alarming, but your response is crucial in reducing its impact and making sure the team is safer in the future.
Remember, if you’re a HazardCo member we will support you throughout this process, just give us a call.
Incidents can range from very minor, to serious incidents. The steps below can be scaled up or down depending on the seriousness of the incident. If you have a near miss on site, this is also considered an incident. Learn more about reporting near misses.
Prioritise Health and Safety
The health and safety of the people involved in the incident should be the main concern. Immediately assess the situation to identify any ongoing dangers and take appropriate action to eliminate or minimise risks. Evacuate affected areas if necessary and provide medical assistance to injured personnel. Remember, health and safety should always come before anything else.
Secure the Scene
Once the immediate safety concerns are addressed, you may need to secure the scene to prevent further incidents or unauthorised access. Erect physical barriers, post warning signs and restrict entry if needed.
Communicate!
Maintaining clear and effective communication during and after an incident is really important.
Notify all the relevant people about the incident as soon as possible. This includes workers, supervisors, managers and contractors.
Report the incident in the HazardCo App
Using the Report Incident feature on your HazardCo App, fill out the fields to capture what happened. Your reported incident will be added to your incident register in the Hub, and HazardCo retains this for as long as you’re a member.
Notifiable Incidents
It’s important to note that some incidents are required to be notified to your Regulator. These are referred to as notifiable incidents. A notifiable incident is:
- A death
- A serious injury or illness, or
- A dangerous incident that exposes someone to a serious risk, even if no one is injured.
In the event of a notifiable incident, you need to preserve the incident site until an inspector arrives or directs you otherwise. This doesn’t prevent you from helping an injured person or making the site safe.
For more information on the Regulator in your state, head over to our help centre.
Find out what happened and why, then complete an investigation report
Investigating the incident will help to find out exactly what happened and why. We recommend talking to the people involved as well as any witnesses. For a serious incident, it’s best to speak to everyone individually.
Document all your findings in a report, including photos and relevant data. In the report, you should look at immediate causes as well as bigger issues and potential improvements to prevent future incidents. HazardCo members can use the guided Investigation Report in the Hub to identify any shortcomings or gaps that may have contributed to the incident and implement corrective actions. This may involve improving training programs, modifying procedures, upgrading equipment, or implementing new safety technologies.
Communicate some more!
Pass on what you have learnt to everyone involved. This is your opportunity to emphasise a culture of continuous improvement and learning to prevent similar incidents in the future.
Encourage open communication and create a supportive environment that encourages workers to report near misses and potential hazards without fear of repercussions.
When an incident occurs on a construction site, a swift and effective response is crucial to reduce risks and ensure the health and safety of your crew. Prioritising safety, establishing clear communication channels, securing the scene, communicating and investigating the incident can continuously improve the health and safety of everyone on site. At the end of the day, these measures protect lives, as well as contribute to the long-term success of the project and your business.
Looking for something in particular?

We’ve all been the new starter on-site, keen as mustard, but probably a bit green behind the ears. While it’s great to see young legends joining the trade, they don’t have the "on-site spidey ...
Nail guns are common on residential builds. Like any power tool, they can cause serious injuries if not used properly.
Most injuries happen when the gun discharges while being moved or repo...
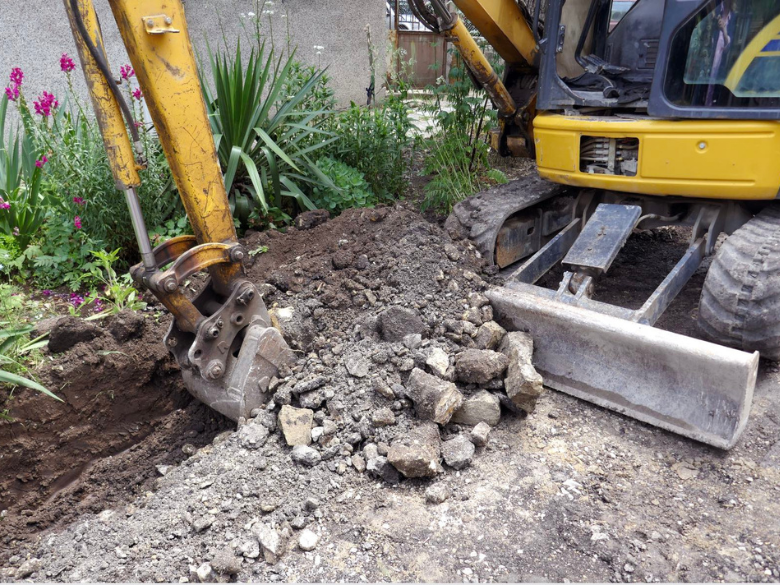
Excavation work means digging or moving soil, rock, or other materials with tools or machinery. It is often done when constructing buildings, building retaining walls, or installing undergroun...

Kick off the New Year safely on site
The holidays are done and dusted, and it’s time to ease back into work. Reopening your site safely is just as important as shutting it down properly and t...

The Christmas break is nearly here. You're probably counting down the days until you can relax and spend some proper time with the family and friends.
But before you lock up for the holiday...

We’ve heard all sorts of myths and misconceptions when it comes to health and safety. We’re here to debunk some of the more common ones we hear.
H&S admin takes too long on-site...

Got lone workers on your team? Here’s what you need to know
If someone on your team is working by themselves without other people around and without direct supervision, they’re likely conside...
Take the Hassle Out of Toolbox Meetings.
Toolbox meetings don’t need to be a paperwork mission. With the HazardCo App, you can run quick, focused chats straight from your phone. No prep, no p...

Get your team scanning in and out – it’s a no-brainer!
We get it, health and safety chats aren’t always the most exciting. But they are the most important. When everyone on-site takes part,...
Working with heavy machinery and managing traffic on-site can be risky. But with the right checks and planning, we can keep everyone safe.
Daily machinery checks
Before starting work each da...

Digging into the ground might seem straightforward, but excavation work is actually one of the most dangerous parts of construction. That’s why it’s important to plan ahead and put the right s...

When you're able to get back on site after a flood or storm, here are the hazards, risks and control measures you should consider to help reduce the risk of injury and illness to yourself, you...


