The holidays are done and dusted, and it’s time to ease back into work. Reopening your site is just as important as shutting it down properly and the New Year is the perfect chance to reset, refocus, and set the tone for the year ahead.
After a couple of weeks off, it’s normal for the team to have a bit of Mondayitis. So on day one, take it slow and run through a few key steps to get everyone back on track safely.
Before anyone gets stuck in, hold a Toolbox meeting:
Go over your SSSP (Site-Specific Safety Plan), walk through emergency procedures, and make sure everyone is fit for work both physically and mentally after the break.
A lot can change while you’re off-site.
Walk the site and note any new hazards or risks, check fences, gates, and signage are secure and make sure access ways are clear and exclusion zones intact.
Inspect structures, scaffolding, and excavations: Weather and time can take a toll. Check scaffolds, excavations, temporary structures, and anything else that could have shifted, been damaged, or affected by the weather.
Check tools, equipment, and mobile plant: Before the team starts using anything, run inspections and pre-starts.
Make sure tools, gear, and mobile plant are in good working order.
Ease back into it, safety first: Think about a soft start. Give everyone time to check their work areas, ease into the pace, and remember that safety is the priority.
Also keep in mind: after a couple of weeks relaxing in air-con, people may not be ready for full heat exposure straight away.
Hot weather brings extra risks, so put simple steps in place to keep your team safe and comfortable.
Provide shade and shelter: Set up shade tents or covered areas. For indoor work, open windows or use fans to keep air moving.
Keep everyone hydrated and protected: Make sure workers always have access to drinking water, and encourage sunscreen, lightweight clothing, sunglasses, and sun-protective hats.
Watch for signs of heat-related illness: Everyone reacts differently to heat. Keep an eye out for symptoms like:
If someone shows symptoms, provide first aid and seek medical help if needed.
If temperatures get extreme, it might be safer to pause work until conditions improve.
Where possible, shift heavy physical tasks to machinery to reduce strain.
Safety is a team effort. Remind everyone to check in on their mates and report any heat stress symptoms early. Quick action can stop things from getting worse.
Keep your team’s health, safety, and well-being front of mind as you head into the New Year.
Here are some handy resources to help:
If you need support or have questions, our Advisory Team is here to help on 0800 555 339.
If you have any questions you can contact our Advisory Team on 0800 555 339.
The Christmas break is nearly here. You’re probably counting down the days until you can relax and spend some proper time with the family and friends.
But before you lock up for the holidays, let’s make sure your site stays safe and secure. We’re all rushing to finish jobs before shutdown, summer’s heating up, there are Christmas catch ups to organise, and everyone’s tired. That’s when shortcuts start looking tempting.
The good news? A bit of prep now means you can actually enjoy your break without worrying about your site. No phone calls about vandalism. No nasty surprises when you get back. Just a proper holiday.
An empty construction site during the holidays can attract unwanted attention. Locked gates help, but unsecured sites are vulnerable to trespassers, theft, and vandalism.
Before you leave: Do a Site Review on the HazardCo App on your last day, that way you’ll know you haven’t missed anything.
When you’re back: Do another Site Review on your first day back. You’ll quickly spot any problems that cropped up while you were away.
Both reviews are saved in your system, so you’ve got a record of your site’s condition before and after shutdown.
If you do need someone on site during the break, you need a lone worker plan in place to make sure they stay safe. Key things to cover:
Spending some time before the break working through our site security checklist now means you can hopefully switch off over Christmas. No wondering if you’ve left something unsecured. No phone calls interrupting your downtime.
Need a hand? Give our Advisory team a call on 0800 555 339 or email info@hazardco.com and we can give you some tips on getting your site ready for shutdown.
Have a safe and restful Christmas.
Good health and safety isn’t about stopping work, it’s about having simple, clear processes so everyone understands how to get the job done safely.
When you plan the work and manage the risks, you build a site where safety becomes second nature.
Before starting any task, pause and look at what could go wrong. A couple of minutes now can prevent someone from getting hurt later.
If it’s not recorded, it’s easy to miss and hard to manage.
A clean, well-run site is a safer site. Regular checks keep everyone on track.
Good sites don’t just happen, they’re reviewed and improved every day.
Safety isn’t a box to tick, it’s how you work.
When everyone takes action, speaks up, and looks out for each other, safety becomes part of everyday work, not just an extra task.
Construction sites come with plenty of obvious hazards but some of the most dangerous ones are the ones you can’t see. One of those hidden risks is respirable crystalline silica dust (RCS).
If you’re cutting, grinding, sanding, or polishing materials like concrete, stone, brick, or mortar, there’s a good chance you’re creating RCS dust. And while it might not look like much, breathing it in can cause serious, long-term health problems.
When silica dust gets into your lungs, it can cause a disease called Accelerated Silicosis. This is a fast-acting, life-threatening condition that scars the lungs and makes it harder to breathe over time. The tricky part? You might not even notice symptoms until the damage is already done.
That’s why it’s so important to understand the risk and take simple steps to control it.
WorkSafe New Zealand recommends several ways to reduce exposure and keep your crew safe:
Most people who develop silicosis didn’t realise they were at risk. That’s why it’s vital to talk about RCS, train your team, and make sure everyone knows how to stay safe.
At the end of the day, the goal is simple: everyone goes home safe and healthy.
Want to learn more about managing silica dust on-site? Get in touch with our friendly team at HazardCo today.We’re here to help you keep health and safety simple.
Slips, trips, and falls, don’t let them take you down!
Slips and trips might seem harmless, but on-site, they’re one of the biggest causes of injuries. A bit of ground clutter, a wet floor, or poor lighting is all it takes to put someone out of action.
Here’s the breakdown:
What’s your role?
Businesses must make sure slip and trip hazards are spotted early and dealt with properly. That means checking the site, managing risks, and keeping controls up to scratch.
How to tackle the risks
Practical ways to reduce the risk
Reducing slips, trips, and falls starts with simple, practical steps that everyone on site can take.
Good housekeeping makes all the difference. The HazardCo App has handy checklists to keep your site tidy and safe.
Don’t wait for a near miss to remind you. Start managing slips and trips today and if you need a hand, the HazardCo team is only a call away.
Your business is only as strong as your people. When workers get injured or struggle with stress, everyone feels it through missed deadlines, extra pressure, and lost skills on-site.
The good news? You can significantly reduce injuries and mental health struggles with the right approach.
Construction has some of the highest injury rates in New Zealand. Strains, sprains, and musculoskeletal injuries are the biggest issue, but they don’t happen in isolation. Physical and mental health are deeply connected. When someone’s stressed or struggling mentally, they’re more likely to get injured – they’re less focused, more tired, and more prone to mistakes. And when someone’s dealing with ongoing pain or injury, it takes a toll on their mental wellbeing. Nearly one in two New Zealanders will experience a mental health issue at some point in their lives, which means someone on your team right now might be dealing with both physical pain and stress feeding into each other.
It’s rarely just one thing that causes problems. Usually it’s a combination of factors working together.
Physical demands like heavy loads, awkward positions, and repetitive movements take their toll on bodies. Add in time pressure, poor planning, and long hours with no breaks, and you’ve got a recipe for injury. Missing or wrong equipment, cramped work areas, and continuous exposure to dust, noise, and vibration all contribute to physical harm over time.
The mental side matters too. Workplace bullying, harassment, and violence create serious harm. So does lack of recognition, unclear roles, poor support from management, and feeling isolated on remote sites. Money worries, relationship issues, and not feeling valued all add to stress levels.
When you look at it this way, you can see why just buying better equipment isn’t enough. You need to tackle the whole picture.
Most physical injuries in construction are preventable. The key is addressing the causes before someone gets hurt.
Mental health deserves the same attention as physical safety. Creating a supportive environment protects your team’s wellbeing and keeps productivity high.
Download our free guide: How to Build a Mentally Healthy Worksite for more practical tips you can use today.
You legally need to monitor your workers’ health if they’re exposed to dust, fumes, chemicals, noise, or repetitive movements. Regular checks for hearing, lung function, and vision can catch problems early before they become serious.
Continuous exposure to these hazards causes progressively worse health issues over time. This is why monitoring matters – it picks up problems like hearing loss, reduced lung function, or vision changes before they impact someone’s ability to work and live normally.
We’ve partnered with Habit Health to make this easier and more affordable. They offer discounted medical checks for HazardCo members, including hearing tests, lung function tests, and vision checks.
We’re here to support you. Get in touch with the HazardCo team or explore our resources and tools designed to make health and safety simple.
If someone on your team is working by themselves without other people around and without direct supervision, they’re likely considered a lone worker. Whether it’s a regular thing or just every now and then, it’s your job to make sure they’re safe and supported.
It’s not just remote bush jobs. Lone workers might be team members who:
If this sounds like anyone on your team, there are a few key things you need to think about:
Lone workers may face more risks, both to their own safety and the gear or materials they’re using. You need to make sure they’re prepared and protected. Vulnerable workers like apprentices and inexperienced workers shouldn’t be working alone.
Working solo can be lonely. No banter. No team catch-ups. It takes a toll.
Stay connected with regular check-ins like phone calls, group chats, or video calls. It doesn’t need to be fancy, just make it consistent. A quick “How’s your day going?” can go a long way.
Just because someone’s working away from the team doesn’t mean they should miss out on training, updates, or important info. Keep the comms flowing so everyone’s in the know – no matter where they are.
Make sure lone workers have the tools and tech to get the job done safely and stay connected. That includes:
Simple, but it works. Pair your lone workers with a buddy – someone they can check in with daily. Share location, talk through the day’s work, and have a bit of a yarn. It keeps morale up and helps you respond faster if something’s not right.
Use the Emergency Plan template in your HazardCo Hub to create a clear plan for how to get help fast if something goes wrong.
Make sure your team knows what the plan is and how it works. Test it out, and keep emergency contact info up to date.
At the end of the day, look out for your lone workers the same way you would if they were right there beside you. A bit of planning and a good dose of communication makes a big difference. Put some restrictions, like no High Risk Work will be done by lone workers.
Need help?
If you’re a HazardCo member, the Advisory Team is just a tap away in the app. We’re here to keep things simple and help you keep your team safe, wherever they’re working.
Toolbox meetings don’t need to be a paperwork mission. With the HazardCo App, you can run quick, focused chats straight from your phone – No prep, no printing, no hassle.
The Toolbox Meeting feature guides you through what to cover, step by step, so you can hold the meeting anywhere on-site and tick off all the right boxes as you go. It’s all recorded in the app, and a full report lands in your Hub, ready to download or share with the team.
Keeping toolbox meetings regular boosts safety in three big ways: they keep safety top of mind with frequent check-ins, help build a strong culture where everyone’s looking out for each other, and give you the chance to spot and fix hazards before they turn into incidents.
What to cover in a Toolbox meeting:
Stuck for ideas on what to talk about? Here’s some great starting points:
Keep your toolbox meetings interactive by getting the crew involved, it makes a big difference. Ask for feedback at the end of each chat to see what’s working (and what’s not). Encourage the team to speak up about any issues they’ve spotted on-site. When everyone has a voice, safety becomes a team effort, not just another box to tick.
Cool tip to save you time: Use your phone’s voice-to-text tool to speak your notes out loud (just look for the little mic on your keyboard). You can even snap a quick photo to record who was there.
Working solo? You can still use the app toolbox feature to log safety convos with other tradies or subbies – Every chat counts.
And remember, the Toolbox Meeting feature isn’t just for toolboxes. Use it for pre-starts, safety meetings, or committee catch-ups too.
Keeping your site safe starts with good conversations – and with HazardCo in your hands, they’re easier than ever.
Get your team scanning in and out – it’s a no-brainer!
We get it, health and safety chats aren’t always the most exciting. But they are the most important. When everyone on-site takes part, it makes a big difference. And the easiest place to start? Get your team and subbies scanning in and out of site each day.
Your HazardCo QR code (on your Hazard Board) makes it quick and easy and the benefits stack up:
Scanning in each day is also a good nudge to stay switched on about safety. The more we talk about it, the more we act on it, spotting hazards and taking care of each other.
It also helps you:
Need help getting the team onboard? Try this:
There’s no downside, scanning in is fast, easy, and helps everyone go home safe. Got questions? Get in touch with the HazardCo team. We’re here to help.
There are lots of good reasons to get everyone scanning that QR code so get your team on board with it today. If you have any questions reach out to the team at HazardCo
Working with heavy machinery and managing traffic on-site can be risky. But with the right checks and planning, we can keep everyone safe.
Before starting work each day, make sure your equipment is ready to go:
Visual checks (before starting the machine):
Stationary function test (with the machine on):
Moving function test:
Using your manufacturer’s checklist or the HazardCo Heavy Machinery Prestart checklist can help you cover all these points.
Keeping vehicles and people safe on-site requires a solid traffic management plan. Here’s what to consider:
Discuss this plan during site inductions so everyone knows the rules and expectations.
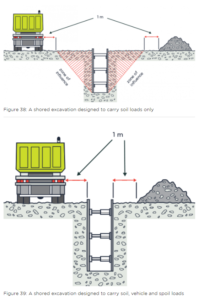
Heavy machinery can affect the stability of excavations if operated too close. Keep all heavy vehicles, materials, and spoil at least one meter outside the zone of influence unless specific designs support closer operations.

Uneven ground can cause machinery to tip over, leading to serious injuries. To prevent this:
If you would like more information head over to our website or to chat with one of our friendly Advisory team please give us a call on 0800 555 339.


