Exposure to silica dust has been spotlighted as one of the major risks to workers in the construction industry. According to 1 NEWS, more than 100 enforcement actions have been taken against Kiwi businesses since alarms were raised in Australia, where there have been several deaths from silica dust.
What is silica dust?
Great question! Silica dust (crystalline silica) is found in some stone, rock, sand, gravel, and clay. You’ll mostly come across it in the following products:
- Bricks
- Engineered stone
- Tiles
- Concrete
- Some plastic material
When these materials are worked on, a fine dust is released known as respirable crystalline silica or silica dust. And it’s this dust that is harmful when inhaled into your lungs.
How can workers be exposed to silica dust?
You may be exposed to silica dust if your work involves:
- Construction
- Kitchen benchtop manufacturing, finishing and fitting
- Abrasive blasting
- Manufacturing of concrete, bricks and tiles
- Monumental masonry work
- Concrete drilling, cutting, grinding, fettling, mixing, handling, dry shoveling, tunneling
- Quarrying and roading
- Foundries
Are there significant health risks?
Yes, and they can be serious if the right precautions aren’t taken. Silica dust is 100 times smaller than a grain of sand, you can be breathing it in without even knowing it.
Workers may develop a series of lung diseases from breathing in silica dust, including silicosis, lung cancer, and chronic obstructive pulmonary disease. There is also some evidence that exposure to the dust may cause kidney disease.
What can be put in place on-site to mitigate the risks?
To follow health and safety laws, businesses should eliminate or minimise exposure to hazards by controlling the risks. For silica dust, this can be done in many ways:
Isolate work areas: Use physical barriers or computer numerical control (CNC) machines.
Look for dust control features: When buying equipment ensure dust-generating equipment has a dust collection system with a filtered air supply.
Use a H-class vacuum cleaner: Workers should not be using household vacuums to remove dust.
Set up exclusion zones: Mark the boundaries of work areas where dust is created. The signs should warn workers and specify the PPE to be used.
Personal Protective Equipment (PPE): PPE should not be the first or only control measure you consider but should be used. Seek expert advice when choosing it and consult with the worker who will be using it.
On-tool extraction: Use Local Exhaust Ventilation (LEV) that fits directly onto the hand-held machines. This is one of the most effective ways of controlling dust.
Water suppression: To be used when LEV is not suitable. Water should be used through non-electric tools to wet dust down at the point of dust generation. Also, make sure equipment and work areas are cleaned regularly with water.
Respiratory (breathing) protection: The type of respirator you choose will depend on the job and the levels of toxicity. Always choose a respirator that fully protects the worker and carry out fit testing so it is sealed tightly against the face.
Exposure and health monitoring: Provide health monitoring for all your workers who may be exposed to silica dust. You can engage with an occupational health practitioner at Habit Health – HazardCo customers even get a special discount.
Training: Health and safety starts with educating your workers. Provide them with information, training, and instruction on the control measures and the potential health impacts.
Remember employers are required to ensure the health and safety of their workers and others at their workplace, and have a duty to control the risks associated with the job.
At HazardCo, we’re all about education and equipping workers with the knowledge they need to get home safe at the end of the day. Educating everyone on-site about the danger and what we can do to reduce them creates a healthier worksite for everyone.
If you have any questions or want to know more about how to protect your team, get in touch today.
The workplace hazards that create risks of harm to psychological (mental) health are known as psychosocial hazards. These hazards, when excessive or prolonged, can cause serious harm. It can have a significant impact on workers, their families and business.
Mental health problems are common, with nearly one in two New Zealanders likely to meet the criteria for a mental illness at some time in their lives. Workplaces that prioritise mental health have better engagement, reduced absenteeism and higher productivity, while people have improved wellbeing and greater morale.
Psychosocial hazards can come from:
- Work relationships and interactions, including bullying, harassment, discrimination, aggression and violence
- The way the work or job is designed, organised and managed
- The equipment, working environment or requirements to undertake duties
What are some of the work-related factors that affect a mentally healthy work site?
- Work-related violence and aggression
- Workplace bullying
- Poor support
- Lack of recognition and reward
- Low role clarity
- Poor organisational justice
- Remote and isolated work
Whose responsibility is it to manage psychosocial hazards?
Workplaces have a legal responsibility to manage risks to mental health and wellbeing just like they do any other health and safety risk.
Knowing where to start can feel overwhelming but getting started doesn’t have to be. Take action to improve the mental health of your team today.
Tips to help build and maintain a mentally healthy work site:
Create a more positive and supportive work site.
-
- Develop an action plan in consultation with your workers about what you can do together.
- Check-in on your workers regularly. Start a genuine conversation. Ask your worker how they are going, and listen.
- Encourage respectful behaviour and communication.
- Walk the talk and lead by example. Supervisors demonstrate their commitment by being supportive and positive on site.
- Show your commitment by supporting mental health organisations and getting involved in awareness events.
- Reinforce the good behaviours regularly and address bad behaviours as they appear.
- Commit to zero tolerance for bullying, discrimination and violence/aggression.
- Encourage and support employees to bring up concerns when they notice unacceptable behaviours.
Establish awareness and support for workers experiencing mental health issues.
-
- Consistently raise awareness about mental health and well-being by having discussions such as 1:1 chats and tool box talks.
- Share information with your workers on mental health and how to seek help to help break the stigma. Posters, emails, and discussions can all be used.
- Encourage staff with mental health conditions to seek treatment and support early.
- Support staff with mental health conditions to stay at or return to work.
Celebrate workers and their efforts.
-
- Praise employees and give regular positive feedback for good work.
- Celebrate team success. A morning tea / BBQ is also great for team bonding.
Take steps to improve role clarity and job satisfaction
-
- Monitor and manage workloads regularly and increase input in how workers do their work.
- Have ongoing and regular conversations with employees about their performance and behaviour.
- Make sure your employees are clear about their roles. Position description, regular 1:1 catchups and reviews.
- Offer opportunities for learning, problem-solving and personal development.
- Support learning – provide opportunities for workers to learn and sharpen their skills, and set interesting challenges.
If you have challenges on your work site related to psychosocial hazards, give us a call for advice. As a HazardCo member you can have a chat with the experienced health and safety Advisory Team for no extra cost.
Lithium batteries are common in everyday life and on the worksite, their lightweight, long life, interchangeability and quick charge benefits mean that they are now used in everything from laptops to power tools to EVs. But did you know that they pose a significant risk and need to be a part of your health and safety plan?
What’s the risk?
Lithium batteries of all sizes have the potential to overheat and catch fire. The fire is hotter, harder to put out and the smoke from these fires is incredibly toxic. Lithium batteries generally overheat if they get wet, damaged or are used with incorrect charging equipment.
Damaged batteries can explode at any time giving off flames that burn anywhere between 500 and 1000 degrees celsius. These fires are very difficult to extinguish as both water and CO2 will only suppress the fire, not extinguish it. Even if the fire has been suppressed it can still ignite again if the battery still contains energy to burn. Lithium batteries are also prone to thermal runaway, which is where one small fault can spread quickly through the battery causing a rapid increase in temperature and potential explosion.
Because of this, lithium batteries need to be properly cared for according to the manufacturer’s instructions to minimise the risk, aside from that, you need a plan in place in case of a fire.
Hot tip: The bigger the battery the bigger the risk of fire and explosion because of the increase in stored energy being released, think energy in = energy out almost instantly so take extra care with larger battery packs – like the ones in your hand held power tools.
Ways to minimise the risk
- Storage: Keep lithium batteries away from spaces where a fire could ignite other things and spread easily. Also, keep them away from extreme temperatures and moisture.
- Charging:
- Always use the correct charger for the battery and do not over charge. Incompatible chargers lead to overcharging and overheating increasing the risk of fire.
- Do not leave batteries charging overnight or unattended. Noise and smoke are early warning signs.
- Consider using a smart charger that monitors battery status and can disconnect power if there is a fault.
- Remote disconnection: Provide easily accessible means for remote disconnection of the battery, think about if you would need to move past it to switch it off at the source if it went up.
- Enhanced fire safety measures: Put in place fire-resistant measures near charging sites. For example; Smoke alarms and fire extinguishers. Wherever possible charge in a cool dry place that lessens the chance of a fire getting into a structure.
- Monitor: Always check equipment for damage during and after use. Damage could include signs of being dropped, crushed or punctured.
- Emergency preparedness & PPE: Develop emergency response plans specific to lithium battery fires, including clear evacuation instructions. Provide clear training on the dangers, insulated tools and appropriate personal protective equipment (PPE) such as insulated gloves for employees involved in any equipment/battery maintenance, or better yet, give it to a professional to get it checked.
Safe lithium battery disposal
Never dispose of Lithium batteries in general rubbish as it can result in a fire in your bin or on the way to a transfer station, creating a risk to those transporting them. The manufacturer should be able to advise safe disposal or check out your local battery recycling centre.
Lithium batteries are going to continue playing a crucial role in our workplaces and lifestyles, so it’s necessary to recognize the potential hazards associated with them. By having awareness of these risks and good practices, we can work together to reduce the potential dangers, resulting in safer working environments where Lithium batteries are used.
If you have any questions, give the Hazardco team a call today!
Making sure your scaffolding is safe and ready for action is key. Here are the times you’ve got to give it a good once over:
- After Installation: Right after it’s set up.
- Every 7 Days: Yep, regular check-ups like clockwork.
- After Tweaks: Any time you make changes, give it a good once-over.
- Post-Storm or Shake-Up: If mother nature throws a fit, give it a look.
- Daily Check Before Use: A quick safety scan before diving in each day.
All scaffolds must be checked by a competent person before handover and scaffolds taller than 5m must be erected and inspected by someone who holds the appropriate Certificate of Competence (COC). Handover checks involve tagging the scaffolding. No matter the height, all scaffolding must have a tag clearly displaying important safety information at access points. The tag should include the following:
- Safety Status: Whether it is safe or unsafe to use.
- Contact details: The name and contact phone number of the person who erected it
- Purpose: What the scaffold is being used for
- Weight Limits: The weight loadings of the scaffold
- Platform limits: The maximum number of platforms or bays that may be loaded
- Limits of Use: Any limitations on the use of the scaffold
- Records: A record of each inspection including who inspected or altered the scaffold and when it was done.
If there’s no tag, do not use it! Get in touch with your scaffold installer to sort it out and get it tagged.
Before starting each day, a pre-start check should be done. This can be done by a competent scaffold user using the HazardCo scaffolding pre-start checklist available from the Hazardco HUB.
Every week a certified scaffolder (if over 5m) or competent person (under 5m) should be checking the scaffolding to make sure it is safe. If the inspector has found any damages or non-compliant areas of the scaffold, then the access ladders need to be removed and the tag updated stating the scaffold is not compliant and should not be used.
A thorough inspection of your scaffolding should also be conducted after any tweaks, fixes, or wild weather. And don’t forget to keep records of all these inspections.
If you have any questions get in touch with the team at HazardCo or have a look at our other working at heights blog here
What are Musculoskeletal Disorders?
A musculoskeletal disorder is any pain felt in the muscles, bones, ligaments, tendons, blood vessels or nerves. You can feel this pain in just one area of the body, or throughout your whole body. The pain can range from mild to severe enough to interfere with your day-to-day life.
The Data
Trades workers have had the highest number of claims by occupation. According to ACC data Ligament, tendon and muscle injuries (also known as Musculoskeletal Disorders or MSDs) made up 65% of all claims. It is the most common type of injury where someone requires more than a week off work, a whopping 1,590 injured construction worker incidents were logged with WorkSafe between Jun22 and May23.
Strains and Sprains in the Construction Industry
The residential construction industry is currently booming and subsequently the ACC claim numbers and payout costs for strains and sprains are also increasing. There are numerous factors which increase the risk of musculoskeletal injuries, these include time pressure, ageing workforces and unsafe lifting techniques.
We need to change the mindsets of workers thinking that “pain and injury is unavoidable” and make our younger workforce understand the combined impacts of repeated injuries – something that more experienced builders know very well.
It is well known that there are a range of factors that contribute to MSDs. It’s not just about a single factor such as the lifting technique (although for industries such as scaffolding and roofing, lifting and handling techniques are an important factor).
The research firmly points to five groups of factors we need to tackle when addressing MSDs in construction as shown in the diagram below these are work organisation, environmental, individual, psychological, biomechanical and physical factors:
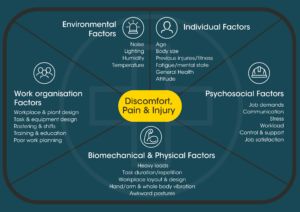
It may not surprise you that physical factors often take most of the blame as their connection is easy to understand, measure and observe. There are also proven strategies to overcome physical factors such as machinery, equipment and task modifications.
Understanding how these factors can combine and influence each other to cause problems will be crucial. Working together and combining solutions to them in your approach is where the construction industry will get the most benefit.
The most common solutions for some of the above risk factors are:
- Micropauses and position changes
- Task rotation
- Stretch warm-up and cool down
- Cardio and strength fitness/flexibility
- Stress management
- Backcare
- Communication
- Work planning
- Early reporting
We dive deeper into what treatment might look like, prevention tips, and the unseen costs associated with MSD in the blogs below:
Musculoskeletal what treatments might look like and prevention tips
5 things you can do to tackle musculoskeletal problems MSDs in your business
Musculoskeletal the hidden costs to workers lives and businesses
If you need anymore information get in touch with the HazardCo team.
Proper management of hazardous substances on-site is important to keep everyone and our environment safe. Legally speaking, hazardous substances refer to substances which have any of the following properties:
- Explosive
- Flammable
- Able to oxidise – (create oxygen)
- Corrosive
- Toxic to humans or the environment
If you are using any hazardous substance in the workplace you need to make sure they are stored, used, transported and disposed of correctly, which will help to reduce the risk to anyone who uses or comes into contact with them.
To capture what hazardous substances you are using you must by law have a hazardous substance register along with the relevant safety data sheet (SDS).
What is a Hazardous substance register?
This is a list of all your hazardous substances (including hazardous waste) that is used, handled, or stored at any of your sites. Having a register will ensure you know the substances you have on-site, the safety measures you need to follow, and what to do in case of an emergency.
Keeping a Hazardous substance register
Keeping your register in a central location on your site means that in case of an emergency, it can be accessed quickly by anyone who needs it.
Here are some key bits of information that need to be included on your register:
- The name of the substance and, if available, its UN number
- A current safety data sheet or a condensed version of the key information from the safety data sheet
- The maximum amount that is stored at the workplace
- Where it’s located
- Specific storage requirements
- Any hazardous waste
Not only do you need the information above, but you must also make sure that the register is up to date and available on-site.
As the register represents the maximum amount of the substance held, it means it’s not going to be a daily task to keep it up-to-date. But if the maximum quantity changes, the register needs to reflect this. We recommend that you review your register each time you make a change to ensure it’s up to date and accurate.
How do I create a hazardous substance register?
Creating your hazardous substance register is made much simpler with our Hazardous Substances Register, HazardCo members can access this via the HazardCo Hub in the templates section.
Safety Data Sheet (SDS)
The purpose of a safety data sheet (SDS) is to provide key information about hazardous substances to the people who handle, use or store them or who could be exposed to them.
An SDS tells you
- The product (its name, ingredients and properties)
- Who manufactured or imported it
- How the product can affect your health
- How to use, store and transport it safely
- How to manage an emergency involving the substance
Remember it is the business owner’s responsibility to have an up to date SDS for each hazardous substance and make sure that their workers have access to it. The SDS must be less than 5 years old.
If you need a hand getting started with your hazardous substances register or would like more information, get in touch with the friendly HazardCo team today – we’re always happy to help.
When it comes to construction sites, ensuring the health & safety and wellbeing of everyone on-site is the top priority. It’s more than just wearing hard hats and high-vis vests. It involves careful planning and preparation of the specific needs, hazards and risks of each project. That’s where Site-Specific Safety Plans (SSSPs) come into play.
A SSSP is a detailed roadmap designed to ensure everyone stays safe from start to finish. It identifies the hazards, how you will minimise the risks, sets clear guidelines, and helps to create a culture of safety on-site.
Setting up health and safety with HazardCo Projects is quick and simple. All you need to do is log in to the HazardCo Hub and “create a Project”. You receive the completed SSSP straight away while the physical scan-in board will be sent out for you to display on-site.
Not only does HazardCo’s Project save you time at the start of your project, it saves time for everyone on the site. Once the project starts, everyone entering the site inducts themselves on-site using the QR code on the site scan-in board, and the QR scanner in the free HazardCo App. That’s right, everyone inducts themselves using their smartphone, no lengthy induction meetings or paperwork required, and you get a record of every completed induction too.
It’s important to get everyone on board including your subbies!
Make sure you request a Task Analysis from each of your contractors so you can include their Hazards and controls in your SSSP. This will help ensure you and others on site are well informed of all the hazards from start to end of the project.
Share the SSSP with the team. Anyone scanning into the site using your QR code and the HazardCo App will have immediate access. Every worker who sets foot on-site needs to know and understand the SSSP. This can be done during the site induction, where the workers learn about the project, potential hazards, and safety protocols, which they can do using the App. If you need more information on working with contractors you can check out this blog.
Why Go Digital?
While there’s no one-size-fits-all approach to creating a SSSP, using digital tools like HazardCo can offer great time saving and streamlining benefits. Among many other benefits of using HazardCo, using it for SSSP means that you have:
- Communication: Getting the site information to the teams on the ground
- Visibility: Anyone scanned into the site can access the SSSP.
- Reporting: You can complete site reviews, risk assessments, toolbox meetings and more for your project via the HazardCo App all from your mobile device.
- Records: Any reports logged in the App while by someone scanned into site, can be viewed and discussed at toolbox meetings. These will all be stored in the Hub and recorded against the project.
Going digital with the HazardCo App means information flows more efficiently and this allows your teams to better collaborate with one another.
So, whether you’re building a multi residential, a new build or doing a big reno, remember: safety first, always. And with a solid SSSP in place, you’re one step closer to a successful and safe construction project.
For health and safety sorted in a flash, right from the very start of your new build, look no further than HazardCo Projects. It’s the smart way to maintain a safe site and have more time to focus on the job at hand.
If you would like to discuss your upcoming project please give our team a call on 0800 555 339.
On the farm or in the factory, transport is a major part of daily life, making vehicle safety a top priority no matter what you are doing. When using vehicles you can break down transport activities into distinct areas Safe Stop, Safe Vehicle, Safe Driver, and Safe Site – so that you can better identify the hazards and take proactive steps to manage the risks.
Safe Stop
The concept of Safe Stop shows the importance of proper shutdown procedures for vehicles and machinery. The steps are straightforward but critical:
- Engage handbrake: Ensure the vehicle or machinery is securely immobilized.
- Controls in neutral: Prevent unintended movement.
- Switch off engine (or turn off power): Shut down the engine or power source.
- Remove key (or lock-off the power supply): Securely store the key or disable the power supply.
Following Safe Stop procedure is essential:
- Before leaving the driver’s seat.
- When anyone approaches the vehicle or machinery.
- Before any maintenance or adjustment tasks.
Safe Vehicle
A Safe Vehicle is one that is well-maintained and suited to the tasks. Consider the following checklist:
- Make sure vehicles are appropriate for the job and equipped with necessary safety features like mirrors for reversing and clear vision in all places.
- Conduct daily inspections, quickly report and fix any faults.
- Regularly maintain braking systems to ensure effectiveness.
Additionally:
- Install roll-over protective structures (ROPS) and seatbelts on vehicles at risk of overturning.
- Protect lift truck (forklift) and loader operators from falling objects.
- Ensure trailers have brakes matched to their loads and speeds.
Safe Driver
The Safe Driver makes sure they are competent, and fit to carry out the task:
- Confirm drivers are medically fit and properly trained.
- Prevent unauthorized individuals from operating vehicles.
- Educate drivers on safe vehicle entry and exit procedures.
Passengers should only be allowed in designated seats that do not hinder the driver’s visibility or access to controls. Mounting or dismounting moving vehicles is strictly banned for safety reasons.
Safe Site
A Safe Site is characterized by organized and secure traffic management:
- Separate vehicle and pedestrian traffic whenever possible.
- Inform visiting drivers about site-specific rules and regulations.
- Minimize the need for reversing by implementing turning circles or one-way systems.
- Maintain well-lit and properly marked traffic routes.
- Ensure silos, bulk dumps and storage areas are away from overhead power lines (OHPLs).
Additional vehicle safety tips include:
- Avoid approaching or walking near reversing vehicles.
- Use audible alarms on vehicles which activate when reversing.
- Provide separate doorways for vehicles and pedestrians in buildings.
- Wear high-visibility clothing to enhance visibility of people to the driver.
By addressing these four key areas—Safe Stop, Safe Vehicle, Safe Driver, and Safe Site—you can significantly improve transport safety.. Regular training, clear procedures, and a commitment to proactive safety measures are essential for protecting everyone involved in transport and vehicle movements.
If you need any advise get in touch or give the HazardCo team a call on 0800 555 339
When it comes to working safely at heights, make sure you’re eating a pie every Sunday. Wait…what?
Yep, you heard that right.
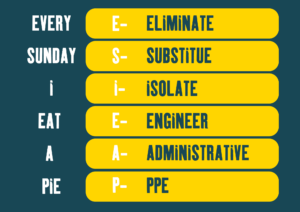
Remember the phrase: Every Sunday I Eat A Pie. It’s a handy way to remember the steps for staying safe: Eliminate, Substitute, Isolate, Engineer, Administrative, and PPE. These steps help you figure out what safety measures to use when you’re working at heights.
No matter the height you are working at, you have to make sure that you are controlling the risks, it doesn’t matter if that work is 40mm from the next surface or 40m.
Just like people argue about the best flavour of pie, there are different ways to working safely at heights, choosing the best methods such as the following examples of controls will be based on your specific situation, and the work being carried out. .
Eliminate: Not everything that needs doing has to be done “up there”. What tasks can be done on the ground before you have to do it at height? Every step achieved where you don’t have a risk of dropping objects is a reduction of other things to concentrate on when at height.
Substitute: What other methods can be used to get to the workspace? Instead of a ladder could you use a scaffold? MEWPs (like scissor lifts & boom lifts) can be really handy here, not only with safe access but also with making it easier on your body to get there and work all day.
Isolate: This means to physically prevent the contact between you and the risk (falling or even dropped objects etc) this can come in the form of guardrails, scaffolding, or nets to prevent things or people from falling to lower levels.
Engineer: This is a more permanent solution, think of your handrails on staircases or cleverly built seats with high backs around the edges of a raised deck. It’s built for purpose and will continue to deliver that outcome without you having to interact with it (passive protection) this is often referred to as safety in design.
Administrative: This is simply making people aware. Think about hazard boards, signs, warnings, toolbox talks or paperwork to communicate what you will be doing, how, and who is doing it when.
PPE: This is the likes of harnesses to prevent you getting to a place you can even fall if possible, and if you do fall then to lessen the severity of the injuries you would receive from a fall if set up correctly, a hard hat to protect your head from small items falling like screws and small items etc.
Remember consistency is key
It’s important you and your team are actively involved in ensuring any work carried out at heights, is done in the safest way possible. Empower your team to speak up, highlight unsafe working situations or practices, and swiftly act to handle them.
We recommend doing a Task Analysis to put a plan in place to manage the risks involved with working at height. This will help you decide whether it’s possible to eliminate the risk of falling from height or what the most effective control/s are to minimise the risk.
So from the above, what’s your favourite flavour combinations? Which ones will satisfy your cravings to keep the team safe today?
If you’ve got a question about working at height or any other health and safety matter, the HazardCo Advisory Team is here to help. Give them a call on 0800 555 339
Over the last 18 months, consents for multi-unit dwellings have grown to the point where there are more multi-unit consents each month than for standalone houses. Coupled with the current economic climate and the security that comes from Council, Kainga Ora or Government work means we are seeing more and more of our residential builders starting to work beyond the more traditional single dwelling build.
How do you define Multi-Dwelling Housing?
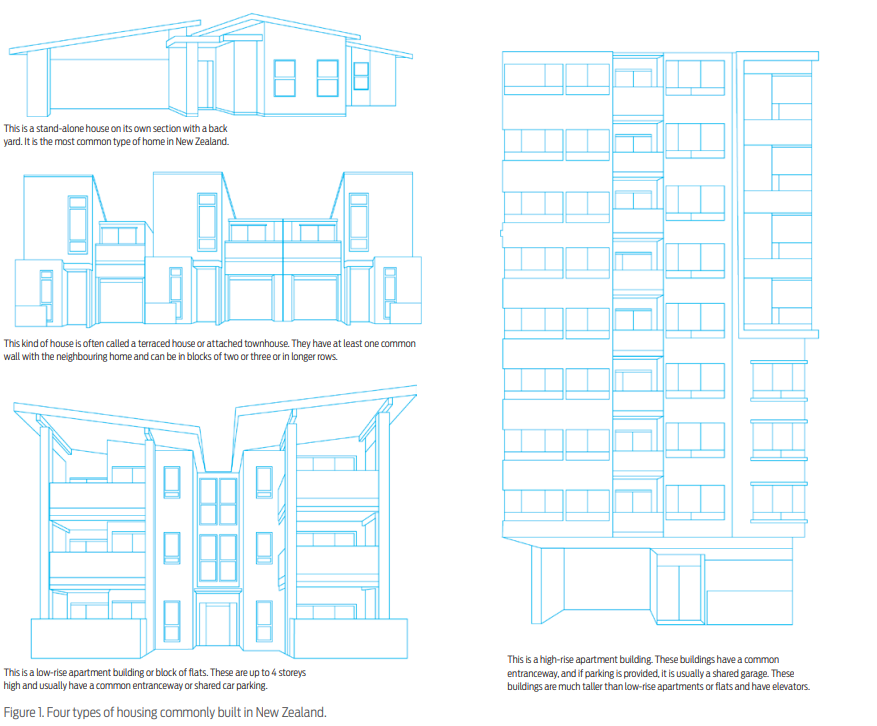
There are three different types of residential housing – low density, medium density, and high density.
- Low density – Usually 1-2 story residential building on an individual section
- Medium density – Multi-unit residential building on a single site eg townhouses, units, apartments and retirement villages
-
- 1–2 story attached houses (e.g. duplexes, triplexes, semi-attached terraced houses)
- 2–4 story attached houses (terraced houses)
- 3–6 story apartments
- High density – Apartment buildings, greater than 6 stories

With increasing pressure on New Zealand’s building stock, medium density housing is considered an attractive option to meet the changing housing needs. Demand for more compact homes is increasing, particularly in areas with rapid population growth (BRANZ, 2023). Multi- dwelling consents made up 48% of all consents in 2021 and were forecasted to continue to increase (Stats NZ, 2021).
What’s the difference?
The key difference between low and multi dwelling housing is the level of complexity required to manage the build and the likelihood of additional layers of responsibility e.g. directors and development owners as PCBU’s above the building contractor.
This complexity of communication around safety means that the builds are often not solely run by a Group Home Builder or single builder and their subbies. Instead, for example, they can be run by project management companies, involving large stages of the build process that is then run and managed by specialists. This adds additional complexities compared to low density housing.
There are often complex stages of these builds, which are generally run by specialised subbies e.g. planning (engineers, architects, quantity surveyors), and build stages (civil works, construction management, carpentry/joiners, concreting) etc.
Multi-dwelling Residential Requirements
Because multi-dwelling housing creates more risk on-site due to the increased amount of subbies, machinery, equipment, and high-risk work taking place, It’s important that you have the right H&S tools in place for your contractors and a safe system of work e.g Site Specific Safety Plan (SSSP) for all medium density builds.
A SSSP for a multi-dwelling build will outline how all involved parties will manage health and safety on-site. This includes a detailed agreement between parties on how they will manage subbies, their expectations, roles, and responsibilities to ensure that all relevant site safety information is available.
The SSSP is intended to be a detailed agreement and communication tool. Due to the potential complexity of multi-dwelling builds, we always recommend a more detailed and customised SSSP.
The extra complexities that can need extra planning and control include:
- Pre-planning of the project, because there are many moving parts, schedules and sensitive timelines.
- Detailing key parties, subbies, and their contact details.
- Multiple responsibilities, e.g. engineers, main contractors of key stages, multiple teams of trades.
- Outlining those shared responsibilities, and the expectations around how safety is to be managed e.g. who is in charge or what, how is information to be gathered and passed on and to whom. Who is in control of managing risks and when?
- The SSSP allows for the detailing of the hazards and risks that are likely to be faced, and what controls are to be used to reduce or eliminate those.
- Plans for emergencies and the site’s response throughout the build.
- Any specific requirements e.g. if working for a government entity, or any specific standards.
- More complex site boundaries e.g. large areas, houses that are sold whilst construction continues in other parts, site boundaries in close proximity to pedestrians etc.
- Traffic management needs, e.g. more trade parking, higher traffic flow of machinery or materials, cranes and concrete pump trucks, council requirements etc.
This list is not exhaustive but all of these complexities are often above and beyond a low density build and need planning, controlling, and communicating to ensure the health and safety of workers and others are managed well.
Got a new multi-dwelling build kicking off?
Project Pro and the HazardCo system are suitable and capable of meeting the H&S requirements of multi-dwelling builds, so you can feel confident that HazardCo can support you as your business grows.
If you are a builder starting to diversify, now’s the right time to review your Health and Safety activity.
That’s where HazardCo comes in. If you’re building 3 or more dwellings within a fenced-off section, you will need HazardCo’s Project Pro. This is a customised project, specifically for your build that gives you everything you need for your team and all the subcontractors you will have coming onto the site.
Here are some key components of Project Pro that will help you cover all your bases.
- 2 x Hazard Board with QR code
- Customised SSSP for the project (reviewed by a H&S Advisor)
- Large HazardCo mesh fence banner
- Full access to the HazardCo system to guide anyone scanning onto site
- In app guided activity to support learning
- Cloud storage of all safety documentation completed on site
- Reporting and analytics to identify opportunities and trends on site
- Support from our Customer support and Advisory teams
If you have a new multi-dwelling residential project kicking off, give us a call on 0800 555 339 or email info@hazardco.com to discuss your requirements and what you need to be thinking about from a H&S perspective and the added complexities that come with it.
Looking for something in particular?

We get it — figuring out what to do after an incident or near miss on-site can feel a bit overwhelming. One of the most common things our Advisory Team hears is, “Do I need to report this?” If...

Dust is a common hazard in the construction industry, especially during demolition or refurbishment. When buildings are demolished they can release materials that create hazardous dust (airbor...

When it comes to working at height, understanding the difference between fall prevention and fall arrest is critical. Fall prevention, also called fall restraint, stops you from being able to ...
Health and safety regulators in New Zealand, are WorkSafe (the main regulator) Maritime NZ, and the Civil Aviation Authority (CAA) is here to work with you, and your workers, to keep everyone ...

The holiday season is over and now it’s time to get back into the swing of things. Coming back to work and reopening your site is just as important as shutting it down. The New Year is the per...

The holiday season is almost upon us and we’re all eager to have a bit of a rest, recharge, and spend quality time with our families. As we wind up 2024, it’s a demanding time as we try to com...

When you have an incident on-site, whether it’s a near miss, an injury, or a work-related illness, it’s important to document an incident report.
Incident reports don’t need to be time-cons...

Every year we see serious injuries and incidents involving vehicles near the top of the data that WorkSafe releases. Needless to say, anything with wheels and an engine should be at the forefr...

Emergencies and natural disasters can happen any time. Although you can’t predict when they will happen, you can take actions to make your business more prepared.
Do you and your workers kn...

Electricity is essential on construction sites, but if the risks are not managed properly, it can pose serious dangers to people and property. Proper controls must be in place wherever electri...

Health and safety is a core part of any business but incidents and injuries on the job can still happen. According to WorkSafe New Zealand’s 2022 - 2023 data, the construction industry had 6,2...

The HazardCo App has a new Plant/Machinery Pre-Start tool! It’s a quick and easy way to do pre-start checks on various plant and machinery such as scissor lists, boom lifts and excavators. Jus...